

CONTRIBUTED BY KANDY
Update: Summer 2011
JCI. It’s one of those “scary” we-don’t-have-this-where-I-come-from type of things. Some people hire someone else to do all the required steps. In July 2008, OkinawaHai published an article about doing it yourself (the entire article is printed below). We’d like to think we’ve empowered many to try it on your own. It’s not hard. If it goes well, it can easily be done in a morning.
Some of the prices have changed from the original article below. The process remains unchanged. Here are the steps our On-Island Manager took to get her Funcargo through JCI in June. Her husband ran the same steps in August. Here are the steps they used:
1) If your hubcaps come off, take them off before you get started.
2) Go and get JCI insurance. There are multiple places to get this done and the price is the same: ¥11,730. We went to ACE inside Kadena’s USO. They open at 0900. Bring your whole package of vehicle registration forms inside.
3) Go to the Joint Services Vehicle Registration Office, building 5638 on Foster. If you come into Foster at the Commissary Gate, take your first right. The building will be your left.
4) Take note of your odometer reading. Take that number, yen and your paperwork package inside.
5) Go in the front doors and head to the counter on the far right. You will pay for weight tax and need your odometer reading. This varies by vehicle. For our 2000 Funcargo I paid ¥15,800. Their hours are 0900-1130 and 1230-1530.
6) Go outside and around the left side of the building to door 6. Pay AAFES $20 for the inspection. The inspector’s hours start at 0930.
7) Get in your car and drive to the rear of the building on the right side. Get in lane 5. When it is your turn, follow their directions (turn signals, hazards, horn, lights, drive into the building, accelerate, break, emergency break, ect.). When they put your car on the lift, you will be asked to get out and wait.
8 ) After they bring your car down from the lift they will tell you to proceed to lane 3 or 4 if you passed. If you need to fix something they will give you a list of things to fix. Depending on what needs to be fixed, you may need to do the inspection over. They will tell you if you need to come back to lane 5 for the entire inspection or come back to lanes 3 or 4 if the fix is not as involved (new tires for example.)
9) Inside lane 3 or 4 they will give you paperwork that you have passed the inspection.
10) Go inside the front door to the same counter where you paid your weight tax. Show them the paperwork that you have passed. They will give you your sticker and annotate your paperwork to show you are good for the next two years.
11) Drive your vehicle through lanes 1 or 2. They will remove your old stickers and apply your new ones.
12) Celebrate! You did it and probably saved yourself a chunk of change!
Notes:
• You will need to be alone in your car. No kids, no passengers. No exceptions.
• If you fail the inspection and return the same day with the car fixed, you will have no additional charges. If you come back the next day you will be recharged ¥1,400 or ¥1,500 (depending on vehicle) at the front counter AND $20 at door #6.
• This website has many helpful instructions for SOFA status vehicles.
Original Article:
A fact of life here on Okinawa are all of the unfamiliarities that come with owning and driving a car. The following post about renewing a JCI is contributed by the very empowering reader, Shannan. 
The dreaded JCI, doesn’t that acronym make you shudder in horror. For me it was the fear of the unknown. I couldn’t find any information on it, and most people pay a garage to do it. I have also heard stories of JCI’s costing from $550 to over $1,200. My husbands car is an older small simple car that we didn’t pay much for initially, haven’t driven much, and were not willing to put more than around $700 into for a JCI. My first step was to call Typhoon motors on Camp Foster. They were not very forthcoming with what my final price would be, but said most are around $750. This fee included a $100 maintenance cushion to be used if something simple such as brakes, or engine cleaning needed to be performed. Anything over $100 you would be billed for afterwards, anything under you get a refund. My husband was all for going this route, they took care of everything. Drop it off by 9 am, and pick up the same afternoon.
My problem with this was a.) I didn’t want to pick the car up at the end of the day owing $950 due to repairs that were needed. b.) I didn’t want to pay Typhoon Motors to do something I could do myself.
So I did, and I saved enough money to not feel bad about the trip I took to Cocoks this week, and my husband still owes me, he owes me big.
Heres how the day went down:
9:00am: Go to an insurance company and purchase a JCI policy. I did this at Kadena USO. The cost was 11,120¥. It is the same for every vehicle. So this fee won’t vary from my car to your van, etc.
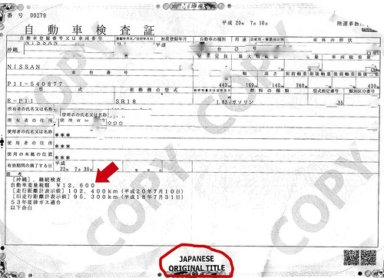
9:40am: Go to JSVRO building (across from the library on Foster, right inside the Commissary gate) to pay the weight tax. Its the desk all the way over to your right. Have your odometer mileage written down, they will need it. To calculate the yen you will need, look at your Japanese Title. Add the number I have circled on my title and 3,200¥ which is the total of the various fees they charge. My total was 15,800¥. After you pay this tax the nice lady will stamp a few pieces of paper and send you to the inspection office.
Walk to the back of the building to door 6 (everything is numbered there, isn’t that nice)). Here you will pay AAFES $20 to inspect the auto. You then walk back to your car and drive around the right side of the building to inspection lane 5. Before you do this remove your wheel covers.
Here the inspection begins. They will guide you through everything. He began with the obvious things, brake lights, turn signals, horn, seatbelt light, etc. Then a machine went across the front of the car with the headlights on high beam, then low beam, making certain the lights were aligned correctly. After that I drove onto some contraption and followed his directions which were something like this “Accelerate to 40, brake, accelerate, brake, emergency brake, pull harder! pull emergency brake harder!!” Might want to practice that move before you go. I thought I was going to fail on the basis that apparently I suck at pulling up my emergency brake.
After that physical exercise, he raised the hood for a quick visual check.
Lastly the car was raised on the lift (with you inside) and they do a quick inspection underneath, checking for I have no idea what.
This is when you get the grade…pass or fail. Luckily we passed the first time with no problems.
If you don’t pass, you can correct any problems same day before 1530 and pay no additional fees.
If the repairs take a day or two you have to pay an additional 1,800¥ for the final inspection. If it takes more than a week, you also must pay the $20 AAFES fee again.
Since I passed, I was allowed to drive on around to the final inspection side (lane 4 I believe). Here he did a quick glance over my paperwork, stamped a few things and sent me back inside the building.
The lady inside changed my title to reflect the new JCI and handed me the golden ticket, I mean, JCI sticker, meaning I was good for 2 more years.
I took this, drove back through lane 2 and yet another nice lady came out and changed my sticker for me.
10:30am: I leave Foster with a $270 JCI and a smile on my face. I hope you can do the same.
Also, along the way I asked if these various fees were refundable. IF we had major work to do, we weren’t going to follow through with the JCI. All is refundable same day except the 3,200¥ fee they charge at the weight tax desk.
You can get a pre-JCI inspection through typhoon motors for $75, and I was told later Kadena Auto Skills does the pre-inspection for $40. So, if you must know about any needed repairs before hand, you can always do that.
UPDATE (as of 1/06/09)
You can start the JCI process up to 30 days before your JCI actually expires. Saves a lot of hassle and stress. Temporary tags are 1,500 yen, and are only good for three days (including date of issue!!) (Update contributed by Penelope.)